|
|
GlobeInt.com, Inc. Your Internet Marketing Solutions Center |
Call Us: 603-448-2110 Schedule Appointment sales@globeint.com |
|||||||
|
|||||||||
Home :: Support :: On-Line Manual :: Chapter 1: Getting Started
| 1: Getting Started | 2: General Features | 3: CGI Scripts | 4: eCommerce | 5: Multimedia & Database | 6: FrontPage | 7: Control Panel |
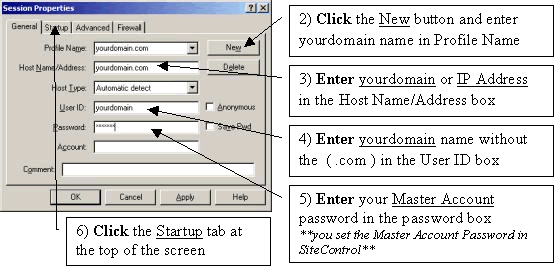
Chapter 1 - Getting StartedIn order to activate your account with GlobeInt.com, Inc., you will need to access Control Panel. Please log into SiteControl using the login information provided for you via email from our support department. You will need to go to
A. Setting Up Your Master Account Password
Once you have logged into SiteControl, you will be prompted
to enter your master account password. 1The master
account password is the password that you will use in order
to upload files or check your default email account. You
master account name is your username. For example, if you
domain name is xyz.com, your master account name and user
name will be xyz. You will need to set your master account
password here. It is recommended that you make your
password something easy for you to remember but difficult
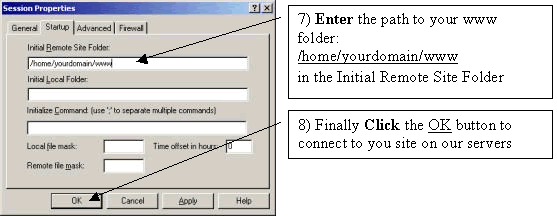
for others to guess. B. Setting Up Your Email Client After you have set your master account password, you will be given the option of setting up your email client. If you wish to set up you email client at this time, you can click on the links corresponding to the email application you are using. Detailed instructions are provided for you to set up your email client. If you wish to use the web-based email, you can skip this page by clicking on skip this step. For details on how to setup your email client, please go to section 1.3 of the online manual. *You can also access this section at any time by clicking on Troubleshooting in the left hand column of SiteControl. C. Uploading Your Files When you have set your email client, or have skipped that section, you will be given the settings required for uploading your files to our servers. If you wish to see these settings now, please click on the link corresponding to your FTP or publishing software. 2You can access this page at anytime by clicking on Troubleshooting in the left hand column of SiteControl. If you clicked on FTP, here is what you should see:
USERNAME: yourdomain PASSWORD: DIRECTORY PATH: www Hostserver: This is your domain name without "www". Also, please note that for the first 10 days you will want to use your IP address to upload your files. If you have any difficulty accessing your account with the domain name after this period, please submit your request to support@globeint.com. If you have registered your domain with any registrar other than Network Solutions, please make sure that you have followed the transfer procedures outlined in your order confirmation email. This message should be titled "Thank you for your order". Username: Please note that this is what is stated and NOT the customerID that you have used to access SiteControl. This is your domain name without ".com". Password: Please note that this is your Master Account password and NOT the password that you have used to access SiteControl. You are free to change this password at anytime using the Account Manager. Directory Path: This is the directory to which you will need to upload your files. 2If you have any difficulties uploading your files, you can refer to section 1.2 of the manual for more information. Your account has now been activated and you are ready to upload!!
1.1.2 Domain Name Registration and Transfers Q. I just activated my account inside SiteControl. Is my domain name active? A. Not just yet. At the time of ordering if you indicated that your domain name is new, we submit the domain name registration request to the domain registrar. Once your domain name is registered with the registrar, which usually takes 24 hours from the time we submit the request, there is a propagation delay period of another 24 to 48 hours. It usually takes 48 to 72 hours after you place your order with us for your domain name to be active. During the propagation period, all the name servers of the world are being informed of your domain name's existence on GlobeInt.com's network. The name server at your ISP must be updated with this new information for you to start using your domain name rather than your IP address. The propagation period could take anywhere from 48 hours to two weeks. It depends on how fast your ISP's nameservers are updated as well as certain conditions on the Internet. This is something we (in fact no human) have any control over. You should check everyday to see if you can bring up your web site by typing your domain name in your browser. Q. I'm transferring my domain to GlobeInt.com from another hosting company? How long is this going to take? A. It should generally take 72 hours. However it's not uncommon for transfer to take a lot longer than this. If your domain has not been transferred for 72 hours, please contact support@globeint.com Q. So how do I upload my files? Do I have to wait until my domain name is active? A. No. You can start uploading your files right now using your IP address. Where you would use your domain name, you would instead put your IP address. In a browser this would be something like http://164.xxx.xxx.xxx; if your ftp program asks for hostserver, put 164.xxx.xxx.xxx; if FrontPage98 asks for where to publish the website, put 164.xxx.xxx.xxx. BTW, if you are transferring your domain to us, you are responsible for uploading your files associated with your Web site. GlobeInt.com does not transfer your web site. We only help you transfer your domain name. Q. I have non-US domains (.ca, .cc, .co.uk, etc). I need your DNS information. A. Though we host non-US domains, we do not register or transfer these domains. To do this, you would need to contact the appropriate NIC authority for the respective TLDs (Top Level Domains). Here is our DNS information you can use:
Q. How do I setup my email client software such as Eudora or Outlook so I can read my email that comes to my GloebInt.com, Inc. domain? A. If you have setup your email software before, then all you need to change is the POP3/SMTP setting, username and password. Your POP3 or incoming mail server) is simply [yourdomain].com. Or you can follow the instruction found at 1.3.1 Setting Up Your Email.
1.1.4 Contacting Technical Support Please contact us using the page. Note to Microsoft FrontPage Users: Please check out Chapter 6 of our online manual before contacting support. You may find that answers to your question are already posted.
1.1.5 Adding additional items on your domain If you wish to add additional items such as Domain Alias, RealAudio, Volano Java Chat, and/or etc., you can request for those items using our Contact Us form. Please note that you will not be charged for items that are included with your plan. For future reference, detailed instructions for SiteControl are also available at SiteControl - Web-based Control Panel
1.1.6 Contacting our Billing Department Please send an email to billing@globeint.com Please include your customer ID or login ID as well as your domain name.
1.1.7 Changing your credit card information securely Currently, we are not accepting payments with credit cards. We are in a process of restructuring the credit card department.
Server OS: Linux 2.0.36 1.1.9 Changing Usernames and Passwords
Please note that the default username we assigned to you originally can NOT be changed.
1.1.10 Acceptable Usage Policy Please review our Terms of Service document.
BEFORE YOU UPLOAD....
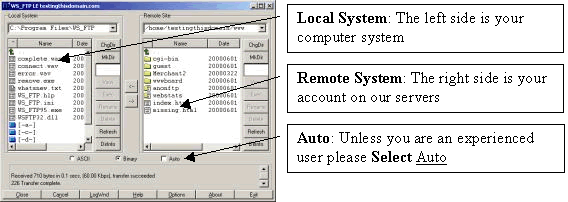
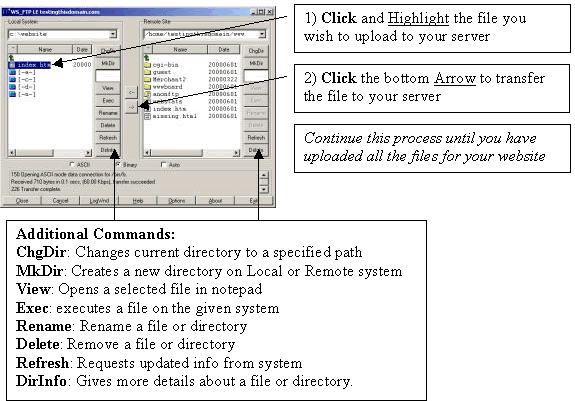
Here are step by step instructions for using WS_FTP version LE:
1.2.3 Using WS_FTP LE (32-bit) 5.08 A. Where do I get WS_FTP LE:
**The following instructions were written for WS_FTP LE (32-bit) 5.08**
  C. Explanation of Interface:
D. How do I upload my files:
**Remember to name the file you wish to have
people see first index.htm or index.html**
1.2.4 Using CuteFTP (32-bit) 4.0 A. Where do I get CuteFTP:
**The following instructions were written for CuteFTP (32-bit) 4.0**
1) After starting CuteFTP a window called FTP Connection Wizard
will pop up. In this wizard you will be asked the following questions:
C. Explanation of Interface:
D. How do I upload my files:
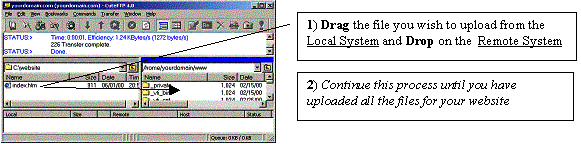
1) Double Click Method:
2) Drag & Drop Method:
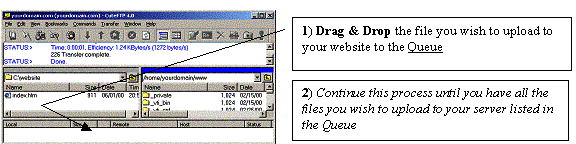
3) Queue Method:
1.2.5 Publishing with Netscape Composer **These instructions were written for Netscape 4.73**
A. How do I Publish with Composer:
2) A new window will appear that asks the following questions:
3) Finally Click the OK button to publish
1.2.6 Using Microsoft® FrontPage® 98
Goto FrontPage Explorer
1.2.7 Using Microsoft® FrontPage® 2000
Open FrontPage2000 This shouldn't prompt you for ftp server but rather connect to your root server directly. In fact if it asks for ftp server, that means that your FrontPage extensions are corrupted. In this case, you would need to backup all your files, and ask us to reinstall your FrontPage extensions. Once the reinstall is complete, you will be informed by us. At this point, you can upload your files again using the method described above.
1.2.8 Windows 2000 Network Place 1) Double Click on My Network Places 2) Double Click on Add Network Place
3) Enter http://yourdomain.com
for Location of network place.
4) Enter Username and Password
5) Enter a name for you Network Place 6) Click Finish You have now created a FTP connection to your website that you can access in My Network Places. You can upload and manage files like you would in the windows environment.
When you first setup your account with us, you are assigned a default email account. Default email account is yourdomain@yourdomain.com. This account is also your catch-all account. This means that any_email_address@yourdomain.com will end up in this account. This ensures that you will not miss any email coming to your domain name. What is the difference between POP3 email account vs. email alias? Each POP3 email account comes with its own password. Let's say you want to give each of your five employees his/her own email account. Then you would request additional email accounts to be setup. An email alias just forwards email to a real POP3 email account. For example, the name of the POP3 email account is john-yourdomain@yourdomain.com. Then you can create john@yourdomain.com as an email alias for john-domain@yourdomain.com. This means that whenever someone sends an email to john@yourdomain.com, the email will be forwarded to john-domain@yourdomain.com Email aliases can be set up by yourself. For instructions, please go to Section 2.2.
1.3.2 Microsoft Outlook Express
Per dialup session, you would need to be authenticated to use the SMTP(Outgoing Mail) server. This is to prevent spammers from gaining access to your SMTP server. Here is how you can be authenticated:
There is a very easy workaround to this. All you have to do is use your ISP's SMTP server. This does not affect how your email address appears on your outgoing emails. When recipients of your message hit the reply button, they will see your email address at your domain name.
1.3.3 Microsoft Outlook 2000/98
Per dialup session, you would need to be authenticated to use the SMTP(Outgoing Mail) server. This is to prevent spammers from gaining access to your SMTP server. Here is how you can be authenticated:
There is a very easy workaround to this. All you have to do is use your ISP's SMTP server. This does not affect how your email address appears on your outgoing emails. When recipients of your message hit the reply button, they will see your email address at your domain name.
Microsoft Internet Mail
*Using SMTP Server Per dialup session, you would need to be authenticated to use the SMTP(Outgoing Mail) server. This is to prevent spammers from gaining access to your SMTP server. Here is how you can be authenticated:
There is a very easy workaround to this. All you have to do is use your ISP's SMTP server. This does not affect how your email address appears on your outgoing emails. When recipients of your message hit the reply button, they will see your email address at your domain name.
|
||||||||||||||||||||||||


|
GlobeInt.com, Inc. 3 High St. Lebanon, NH 03766 Local: 603-448-2110 sales@globeint.com |
Resources FAQ Center Data Center Glossary Control Panel Online Manual Webmail |
Portfolio About Us Policies Contact Us Employment Reseller Services |
||
| © Copyright 1999-26, GlobeInt.com, Inc. All rights reserved. | ||||